
Basic Hand Stitches
- Vinaykumar Guruswamappa
- Nov 13, 2022
- 6 min read


Sewing
Sewing is one of the oldest Textile art. It’s an interesting art and skill.
it is form of art to learn with a needle and thread. Hand stitches are doing well in current market.
Learner or Experienced, it’s all matter of stitching technique and hand stitches.
Hand stitching are used not only to alter and also to create designs on the surface of the fabric or garment by adding value and aesthetic appeal to garments
Fine Hand Sewn are always considering high quality tailoring, example haute couture fashions, handmade suits, custom made dress. Other than textile artists, people have always came forward by learning this art to express their creativeness and traditions.
Essential tools to start
Fabric
Thread
Hand Sewing Needle
Scissor/ Cutter
Needle Threader
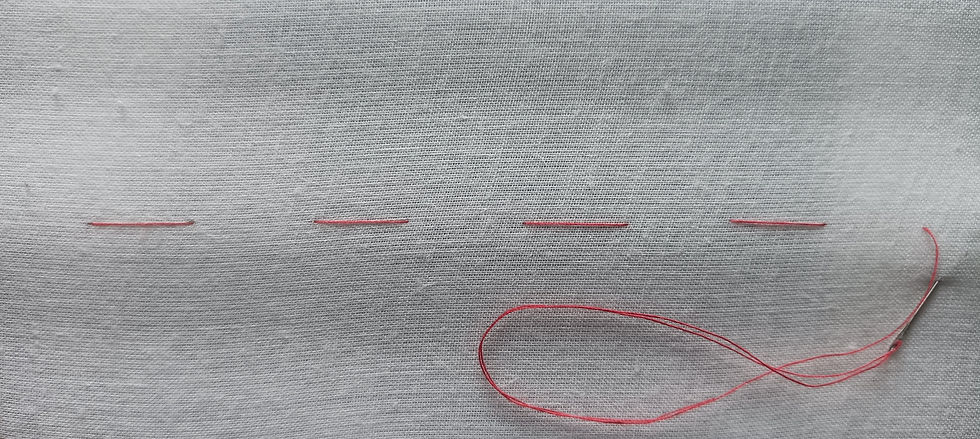
Running Stitch
A fine stitch made in series, row of small hand stitch made to hold the two layers of fabric until the permanent stitch is done. this stitch is also called as temporary stitch. By using single thread with a knot at the end make several running stitches at once with equal distance. And make sure that the thread is neither loose nor tight so that the two pieces of fabric remain flat. This basic stitch used as temporary stitch alternative to pinning. Once stitches are done, run machine stitch and remove this temporary stitch by pulling thread at end.
A few applications for the running stitch:
• hand darning, which is extremely delicate gathering.
This Stitch also serves as decorative stitches, when this stitch is using for decorative purpose make sure tie knot at the end of thread, make running stitch once at equal distance, after completion secure the end with a few back stitches. These stitches can be used to decorate collar, cuff, yoke, front button placket etc. you can also use multiple thread for decorative purpose to emphasis the area/stitches.

Basting Stitch
It’s simple temporary stitch similar to running stitch. It is used for hand stitching your fabrics or pattern on the fabric before machine sewing a hemline or pocket placement or to do any kind of patch work. This is one of the good technique rather than pinning. It is done with a single thread, so that you can easily remove it once you are done with the sewing without damaging your garment. Tie a knot at the end of the single thread and make wide stitches of about 1 to 2cms from one another. After completing hand stitching, secure the thread at the end by knot.to keep it for longer duration until you need it.
Even Basting- In this, both stitches and spaces are equal Length. It varies according to Strain. The greater the strain, closer together the stitches.
Uses- Used as temporary stitch to hold the two or more layers together until the permanent stitch is done.
Uneven Basting- In this stitches are small and thread on the right side are longer. The size of the stitches and spaces are varies depending on their use.
Uses- For marking Grain of fabric, temporarily done to hold bottom hem, and long seams where there is no strain.
.
Back Stitch
This is a stronger and reliable hand stitch which performed with a single thread. It resemble machine stitch on right side. It can be used to repair seams as well as replace zippers. Do single stitch in and out of the fabric, and then go back with the needle to a place before the previous stitch is out. Then bring the needle one stitch ahead of the previous one. After finishing, the front look straight and neat in a row, and the back will have longer and overlapping stitches. avoid stitching too tight or too loose in order to prevent puckering.
The stitch is used:
• To keep fabric pieces together neatly – sew or alter seams.
• As an alternative to machine sewing in handcrafted clothing.
• As Inner stitching for delicate garments and where difficult for machine-to-reach location.
• To Fix a zipper in by hand.


Overcast Stitch
It is used to secure finishing of cloth edges to maintain them tidy and prevent raveling at the raw edges. Short, diagonal stitches are used to create the overcast over the fabric's edge. Pulling out the needle should be done from the back of the fabric, 1/4 inch from the raw end. Continue same till the length you want to; the thread will enclose the raw edge. Make sure to keep the spacing and stitch length constant. Crossing the diagonal stitches over and creating little x-s as you go is how to double overcast. Double overcast stitch will give smooth finish to fabric edges.
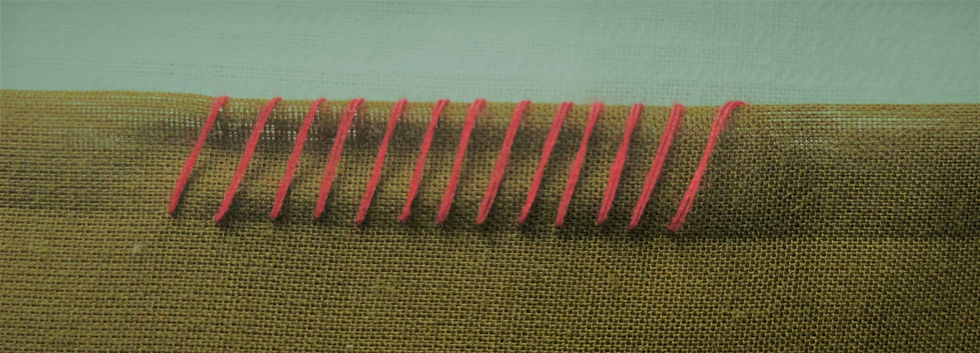
Blanket stitch (buttonhole stitch)
A stitch that is used to strengthen the edge of thick textiles/fabric. It is also called buttonhole stitch as apart from edging blankets, it is also used for finishing buttonholes. The blanket stitches are spaced at a quarter or half inch distance. Bring the needle 1/4 inch from the end of the fabric, starting from the back. To the front, pull the thread through. Then, put the needle a very little distance from where you started, and draw the fabric from the front to the rear. Pull out the thread while keeping it tucked behind the needle point. The stitches should be uniform in size and spacing and perpendicular to edge.
You can make it attractive by varying stitch length or grouping stitches.
Uses- to hold narrow hems or appliqued designs in place, to finish raw edges of blankets, and to outline decorative designs.

Hemming Stitch
The hemming stitch is a small stitch made on the first turn of a twice folded edge. Hold fabric, turned edge basted in place, keep wrong side up across forefinger of left hand, with the second turn or outside edge toward palm of hand. Secure end with a knot in the thread and conceal it under the edge to be hemmed, or fasten thread by slipping needle into first fold of turned edge and continue stitches on top. Always start work from right to left. Secure thread by knotting when finished, take two or three stitches on top of each other in folded edge.
Types of Hemming stitch:
- Blind Hem Stitch
As the name says this stitch is "blind" because of, making the stitches practically invisible. You shouldn't tug too hard on the thread. To carry out the stitch, hold the work with the fold of the hem towards you, take a very small stitch inside the hem fold edge, On the inside fold of the garment's hem, pick up a thread of the single cloth with the needle's point before sewing again. These stitches are used depending on the requirement. To make invisible at right side of the garments.

- Slant Hem stitch
On medium-weight or lightweight materials, it is utilized for hems. It is mostly used to flatten seams or secure a raw edge that needs to be turned in. It appears as tiny, slanted stitches on the fabric's reverse. The cloth will determine the stitch size. The fabric will pucker if the thread is tugged taut. To finish necklines, facings and bindings etc.

Catch stitch
Work left to right from one edge of the cloth to the other to create an X-like shape. An X-like shape provides some elasticity or "give" to the stitch.
It is used:
• For hemming.
• To fasten the face to the edge of the seam.
• Hold the Fabrics together.
A tuck stitch can be worked edge-to-edge across the edge of the fabric. This is also called a flat catch stitch. A small stitch is made 1/4 inch below the edge of the hem. Another small stitch is incorporated into the garment at the edge of the hem. As the stitches move from left to right, the needle points to the left. Please note that
Cross-stitch tack
For both decorative stitching and functional stitching. Stitching adds some flexibility and security to the area. It is often used when lining jackets and coats and securing pleats and darts in the center of the back. It can be either single-threaded or double-threaded.

Chain Stith
This stitch looks like a chain. These stitch are done uniform in size, stitches formed by interlocking from where each stitch starts and closed at the top. These stitches are widely used for decoration purpose by making design outline or filling design surface.
References:
- ‘Garment Construction’ by Edna M. Challahan and Edith Berry Extension Specialist in Clothing, The Ohio University.
Comments